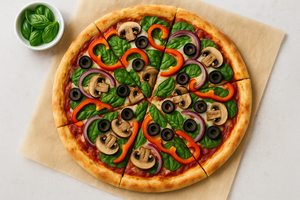
If you’ve ever dreamed of creating perfectly soft, chewy, and flavorful pizza dough at home—without all the arm-tiring kneading—this Pizza Dough Stand Mixer Recipe is the ultimate shortcut to pizzeria-quality results. Using a stand mixer ensures consistent gluten development, silky dough texture, and a reliable rise every time. Whether you're a seasoned home chef or brand-new to pizza-making, this recipe gives you a sturdy foundation for classic pizzas, calzones, strombolis, and more. With just a handful of pantry staples and your trusty dough hook, you’ll have smooth, elastic dough ready for topping in no time.
Prep & Cook Time
- Prep Time: 15 mins
- Cook Time: 12–15 mins (for baking the pizza once topped)
- Additional Time: 1 to 2 hours rising time
- Total Time: 1 hr 30 mins – 2 hrs
- Servings: 4
- Yield: 2 medium pizza crusts or 1 large crust
Ingredients
- 3 ½ cups bread flour (plus extra for dusting)
- 1 ⅓ cups warm water (110°F)
- 2 ¼ teaspoons active dry yeast (1 standard packet)
- 2 teaspoons sugar
- 2 teaspoons fine sea salt
- 1 tablespoon olive oil (plus extra for greasing bowl)
Directions
Step 1: Activate the Yeast
- In a small bowl, combine warm water, sugar, and yeast.
- Stir gently and let sit for 5–10 minutes, or until the mixture becomes frothy.
Tip: If the yeast doesn’t foam, discard and start again—your water may have been too hot or too cold.
Step 2: Prepare the Dry Ingredients
- In the bowl of a stand mixer, add bread flour and salt.
- Fit the mixer with a dough hook attachment.
Step 3: Form the Dough
- Turn the mixer to low speed and slowly pour in the yeast mixture.
- Add the olive oil.
- Once the dough begins to come together, increase speed to medium-low (KitchenAid Speed 2).
- Knead for 8–10 minutes, or until the dough becomes smooth, elastic, and pulls away from the sides of the bowl.
Best Practice: Resist adding too much flour. The dough should be slightly tacky, not sticky.
Step 4: First Rise
- Lightly oil a clean bowl.
- Transfer the dough to the bowl, turning it once to coat with oil.
- Cover with plastic wrap or a damp towel and allow to rise for 1 to 2 hours, or until doubled in size.
Warm Environment Tip: If your kitchen is cool, place the covered bowl in an unheated oven with the oven light on.
Step 5: Shape the Dough
- Punch down the dough gently to release trapped air.
- Divide into 2 equal balls for medium pizzas or keep whole for one large pizza.
- Let the dough rest for 10 minutes to relax the gluten before stretching.
Step 6: Build & Bake
- Preheat oven to 475–500°F (or as hot as your oven allows).
- Stretch or roll the dough into your desired shape.
- Add sauce, cheese, and toppings.
- Bake 12–15 minutes, or until the crust is golden and crisp.
Nutrition Facts (per serving) - Estimated values
- Calories: 220
- Protein: 6g
- Carbohydrates: 40g
- Fat: 3g
- Saturated Fat: 0.4g
- Sodium: 290mg
- Fiber: 1g
- Sugar: 1g
Pro-Tip:
If you’ve ever struggled with kneading dough by hand or wished for more consistent results, a high-quality stand mixer can completely transform your pizza-making experience. Using the dough hook ensures perfect gluten development, a smooth and elastic dough texture, and a hands-free process that saves time and effort. If you don’t currently own a stand mixer—or if you’ve been thinking about upgrading to a newer, more powerful model—this recipe is the perfect reason to invest. A good mixer isn’t just convenient; it delivers professional, reliable results every single time. Click the button below to explore some of the best stand mixers available on Amazon and find the one that fits your kitchen best.
Conclusion
This Pizza Dough Stand Mixer Recipe is your gateway to homemade pizza perfection. With minimal effort and simple ingredients, you’ll enjoy a dough that’s beautifully elastic, easy to shape, and reliably delicious. Whether you prefer a classic Margherita, a loaded supreme, or a thin-crust creation, this stand-mixer dough offers the ideal base for every pizza night. Once you try it, you may never go back to store-bought dough again!